From Notebook To Production Part 2
In Part 1, I built and tested a Flask application that serves one of my own models as an API. In Part 2 we are going to containerize that application using Docker.
What are Containers, and why should we use them?
Linux Containers are an easy, lightweight, and portable way to package an application and all of its dependencies. The container is comprised of a minimal Linux image that contains only the dependencies needed to run the application packaged inside of it. They are kind of like Virtual Machines except a Virtual Machine includes an entire operating system, and a container has only enough of the operating system to run the application. This difference allows containers to be much smaller. Usually measured in MBs, whereas VMs could be tens of GBs.
We like Docker Containers for a few reasons:
-
Portability
Containers will run anywhere. Linux, Mac, Windows, bare metal, or VM, It does not matter. If it can run a container, it will run your container. -
Consistency
Docker containers allow developers to create a runtime environment that will remain consistent no matter where it goes. So no more, “Well, it worked on my machine!” This makes the testing and deployment of applications much more manageable. -
Lightweight
Containers are small. They can usually be measured in MBs, whereas VMs could be tens of GBs.
Docker is a software that makes it easier to create and run containers. Lets put my Flask Application into a Linux Container.
Containerize the Application
A Dockerfile is used to pull the Linux image from Docker Hub and package all of your files and dependencies into a Docker Image.
What is happening in this Dockerfile?
My Dockerfile uses a multistage build.
Why two stages?
Some of the python packages require GCC to compile its code for install. I didn’t want the extra 350MB that GCC adds. So I do all of the building in the Stage One image and copy the built python packages into the second stage. The second stage has all of the needed python packages without the extra bloat of a full GCC install.
Stage 1: Builder
Stage one is the “Builder,” it pulls a Linux image built for python from docker hub, installs the GCC compiler, creates a new python virtual environment, and installs all of the python packages from requirements.txt into the python virtual environment.
FROM python:3.7-slim-buster as builder

# set a working directory
WORKDIR /app

# Sets utf-8 encoding for Python
ENV LANG=C.UTF-8

# Turn off writing .pyc files.
ENV PYTHONDONTWRITEBYTECODE=1

ENV PYTHONUNBUFFERED=1

# Ensures that the python and pip executables used
# in the image will be those from our virtualenv.
ENV PATH="/venv/bin:$PATH"

# use apt get to install gcc in the Linux Container
RUN apt-get update
RUN apt-get install -y --no-install-recommends build-essential gcc \
    && apt-get clean

# Setup the python virtualenv
RUN python -m venv /venv

# copy in the list of python packages to install
COPY requirements.txt requirements.txt

# Intstall the non GPU torch python package
RUN  pip install torch==1.3.1+cpu torchvision==0.4.2+cpu \
 -f https://download.pytorch.org/whl/torch_stable.html

# Install the python packages into the python virtual environment
RUN pip install --no-cache-dir \
                -r requirements.txt
Stage 2: App
Stage 2 builds our final docker image. The first copy command moves a copy of the Python virtual environment created in Stage 1 into this image. So this image has all of the required python packages and none of the bloat from a full GCC install. Next, it Copies in all of the application files, exposes port 500, and defines the command to launch the application.
# second stage container that will hold the app
FROM python:3.7-slim-buster AS app


# Ensures that the python and pip executables used
# in the image will be those from our virtualenv.
ENV PATH="/venv/bin:$PATH"

WORKDIR = /app

# copy in the python virtual environment from the builder image
COPY --from=builder /venv /venv

# copy the application and model files into the image
COPY app.py ./
COPY predict_functions.py ./
COPY test_app.py ./
COPY wsgi.py ./
COPY export.pkl ./

# expose the container at port 5000
EXPOSE 5000

# start up the gunicorn http server and lauch the flask app
ENTRYPOINT [ "gunicorn","--bind","0.0.0.0:5000","wsgi:app" ]
To use a multistage build, we combine each of these stages into one docker file.
FROM python:3.7-slim-buster as builder

# set a working directory
WORKDIR /app

# Sets utf-8 encoding for Python
ENV LANG=C.UTF-8

# Turn off writing .pyc files.
ENV PYTHONDONTWRITEBYTECODE=1

ENV PYTHONUNBUFFERED=1

# Ensures that the python and pip executables used
# in the image will be those from our virtualenv.
ENV PATH="/venv/bin:$PATH"

## use apt get to install gcc in the Linux Container
RUN apt-get update
RUN apt-get install -y --no-install-recommends build-essential gcc \
    && apt-get clean

# Setup the python virtualenv
RUN python -m venv /venv

# copy in the list of python packages to install
COPY requirements.txt requirements.txt

# Intstall the non GPU torch python package
RUN  pip install torch==1.3.1+cpu torchvision==0.4.2+cpu \
 -f https://download.pytorch.org/whl/torch_stable.html

# Install the python packages into the python virtual environment
RUN pip install --no-cache-dir \
                -r requirements.txt

# second stage container that will hold the app
FROM python:3.7-slim-buster AS app


# Ensures that the python and pip executables used
# in the image will be those from our virtualenv.
ENV PATH="/venv/bin:$PATH"

WORKDIR = /app

# copy in the python virtual environment from the builder image
COPY --from=builder /venv /venv

# copy the application and model files into the image
COPY app.py ./
COPY predict_functions.py ./
COPY test_app.py ./
COPY wsgi.py ./
COPY export.pkl ./

# expose the container at port 5000
EXPOSE 5000

# start up the gunicorn http server and lauch the flask app
ENTRYPOINT [ "gunicorn","--bind","0.0.0.0:5000","wsgi:app" ]
My file structure now looks like this:
FLASK_APP
   |
   +---app.py
   |
   +--predict_functions.py
   |
   +--wsgi.py
   |
   +--test_app.py
   |
   +--Dockerfile
Build the image
Docker has a convenient CLI for building and running images.
The . at the end of the docker build command tells docker to look in the current directory for the dockerfile.
When you use docker build docker will start to build your docker image to the specification set up in the Dockerfile.
docker build -t modelapi:latest .
Step 1/26 : FROM python:3.7-slim-buster as builder
 ---> 69afd9568c9d
Step 2/26 : WORKDIR /app
 ---> Using cache
 ---> db75aa098bca
Step 3/26 : ENV LANG=C.UTF-8
 ---> Using cache
 ---> fdb1b368e9ef
Step 4/26 : ENV PYTHONDONTWRITEBYTECODE=1
 ---> Using cache
 ---> b581775eabb6
Step 5/26 : ENV PYTHONUNBUFFERED=1
 ---> Using cache
 ---> 8d0998d803e4
Step 6/26 : ENV PATH="/venv/bin:$PATH"
 ---> Using cache
 ---> 2311068843bc
Step 7/26 : RUN apt-get update
 ---> Using cache
 ---> a3a00220d737
Step 8/26 : RUN apt-get install -y --no-install-recommends build-essential gcc     && apt-get clean
 ---> Using cache
 ---> 113ede23c7a6
Step 9/26 : RUN python -m venv /venv
 ---> Using cache
 ---> f47ad1bc14a6
Step 10/26 : COPY requirements.txt requirements.txt
 ---> Using cache
 ---> 78a18494285e
Step 11/26 : RUN  pip install torch==1.3.1+cpu torchvision==0.4.2+cpu  -f https://download.pytorch.org/whl/torch_stable.html
 ---> Using cache
 ---> 8fdf3a09b78b
Step 12/26 : RUN pip install --no-cache-dir -r requirements.txt
 ---> Using cache
 ---> 88a290ddf6ad
Step 13/26 : FROM python:3.7-slim-buster AS app
 ---> 69afd9568c9d
Step 14/26 : ENV PYTHONDONTWRITEBYTECODE=1
 ---> Using cache
 ---> d588c68f746f
Step 15/26 : ENV PYTHONUNBUFFERED=1
 ---> Using cache
 ---> a066f0c0e519
Step 16/26 : ENV PIP_DISABLE_PIP_VERSION_CHECK=1
 ---> Using cache
 ---> 9615c72ccc74
Step 17/26 : ENV PATH="/venv/bin:$PATH"
 ---> Using cache
 ---> ba232209d55e
Step 18/26 : WORKDIR = /app
 ---> Using cache
 ---> 2ac7b85fe5ef
Step 19/26 : COPY --from=builder /venv /venv
 ---> Using cache
 ---> d516ec53e7a3
Step 20/26 : COPY app.py ./
 ---> 78329eabb808
Step 21/26 : COPY predict_functions.py ./
 ---> 3ae0460cfe5f
Step 22/26 : COPY test_app.py ./
 ---> 73922c800297
Step 23/26 : COPY wsgi.py ./
 ---> 4bd77d8d670e
Step 24/26 : COPY export.pkl ./
 ---> b8ceef3ac62d
Step 25/26 : EXPOSE 5000
 ---> Running in a202f9360bfe
Removing intermediate container a202f9360bfe
 ---> 35b1e5dab303
Step 26/26 : ENTRYPOINT [ "gunicorn","--bind","0.0.0.0:5000","wsgi:app" ]
 ---> Running in 0856501070ad
Removing intermediate container 0856501070ad
 ---> 4a419bdbda80
Successfully built 4a419bdbda80
Successfully tagged modelapi:latest
Run the image
Docker spins up the image and runs it as a container.
docker run -p 5000:5000 modelapi:latest

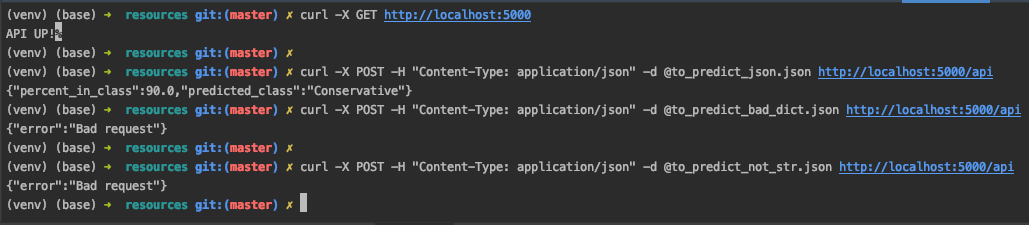
Send API request to the application running in the container
In Part 3 we will set up a managed Kubernetes Cluster in a commercial cloud environment. Then we will use GitLab CICD to automate the deployment and scaling of this application to our Kubernetes Cluster. GitLab will build, test, and deploy our application.